Implementing
Custom Tests
Developer Fundamentals — Module 3 of 4
Click to start
Learning objectives
“As a developer who has run and logged out-of-the-box tests with ValidMind, I want to update my documentation template to include manually inserted test results, implement, run, and log custom tests, and include those custom tests in my documentation template.”
This third module is part of a four-part series:
Developer Fundamentals
Module 3 — Contents
Introduction
First, let’s make sure you can log in to ValidMind.
Training is interactive — you explore ValidMind live. Try it!
→ , ↓ , SPACE , N — next slide ← , ↑ , P , H — previous slide ? — all keyboard shortcuts
Before you begin
To continue, you need to have been onboarded onto ValidMind Academy with the Developer role and completed the first two modules of this course:
- Log in to check your access:
Be sure to return to this page afterwards.
- After you successfully log in, refresh the page to connect this training module up to the ValidMind Platform:
ValidMind for model development
Jupyter Notebook series
When you run these notebooks, they will generate a draft of model documentation and upload it to ValidMind, complete with supporting test results.
You will need to have already completed notebooks 1 and 2 during the first and second modules to proceed.
ValidMind for model development
Our series of four introductory notebooks for model developers include sample code and how-to information to get you started with ValidMind:
1 — Set up the ValidMind Library
2 — Start the model development process
3 — Integrate custom tests
4 — Finalize testing and documentation
In this third module, we’ll run through the remaining two notebooks 3 in Section 1 and 4 in Section 2 together.
Let’s continue our journey with Section 1 on the next page.
Section 1
Get your code snippet
ValidMind generates a unique code snippet for each registered model to connect with your local environment:
- Select the name of your model you registered for this course to open up the model details page.
- On the left sidebar that appears for your model, click Getting Started.
- Locate the code snippet and click Copy snippet to clipboard.
Can’t load the ValidMind Platform?
Make sure you’re logged in and have refreshed the page in a Chromium-based web browser.
Connect to your model
With your code snippet copied to your clipboard:
- Open 3 — Integrate custom tests: JupyterHub
- Run all the cells under the Setting up section.
When you’re done, return to this page and click to continue.
Implement custom tests
Custom inline tests
Try it live on the next pages.
Let’s implement a custom inline test that calculates the confusion matrix for a binary classification model:
- An inline test refers to a test written and executed within the same environment as the code being tested — in the following example, right in our Jupyter Notebook — without requiring a separate test file or framework.
- You’ll note that the custom test function is just a regular Python function that can include and require any Python library as you see fit.
Create a custom test
The @vm.test wrapper allows you to create a reusable test:
- Continue with 3 — Integrate custom tests: JupyterHub
- Run all the cells in the following section under Implementing a custom inline test: Create a confusion matrix plot
When you’re done, return to this page and click to continue.
Adjust your custom test
Custom tests can take parameters just like any other function:
- Continue with 3 — Integrate custom tests: JupyterHub
- Run all the cells in the following sections under Implementing a custom inline test:
- Add parameters to custom tests
- Pass parameters to custom tests
When you’re done, return to this page and click to continue.
Log your custom test
Use the .log() method to send the results of your custom test to the ValidMind Platform:
- Continue with 3 — Integrate custom tests: JupyterHub
- Run the cell in the following section under Implementing a custom inline test: Log the confusion matrix results
When you’re done, return to this page and click to continue.
Use external test providers
Reusable custom tests
Try it live on the next pages.
External test providers
Creating inline custom tests with a function is a great way to customize your model documentation.
- However, sometimes you may want to reuse the same set of tests across multiple models and share them with others in your organization.
- In this case, you can create an external custom test provider that will allow you to load custom tests from a local folder or a Git repository.
Create custom tests folder
Create a new folder that will contain reusable custom tests from your existing inline tests:
- Continue with 3 — Integrate custom tests: JupyterHub
- Run the cell under the following Using external test providers section: Create custom tests folder
When you’re done, return to this page and click to continue.
Save inline test
The @vm.test decorator also includes a convenience method that allows you to save the test to a Python file at a specified path:
- Continue with 3 — Integrate custom tests: JupyterHub
- Run all the cells under the Using external test providers section: Save an inline test
When you’re done, return to this page and click to continue.
Register local test provider
Next, let’s initialize a test provider that will tell the ValidMind Library where to find your saved custom tests:
- Continue with 3 — Integrate custom tests: JupyterHub
- Run all the cells under the Using external test providers section: Register a local test provider
When you’re done, return to this page and click to continue.
Custom test results
(Scroll down for the full instructions.)
Try it live on the next page.
Add test results to model documentation
With the custom test results logged, let’s head to the model we connected to at the beginning of this notebook and insert our test results into the documentation:
From the Inventory in the ValidMind Platform, go to the model you connected to earlier.
In the left sidebar that appears for your model, click Documentation under Documents.
Locate the Data Preparation section and click on 3.2 Model Evaluation to expand that section.
Hover under the Pearson Correlation Matrix content block until a horizontal line with a button appears, indicating that you can insert a new block.
Click and then select Test-Driven Block under from library:
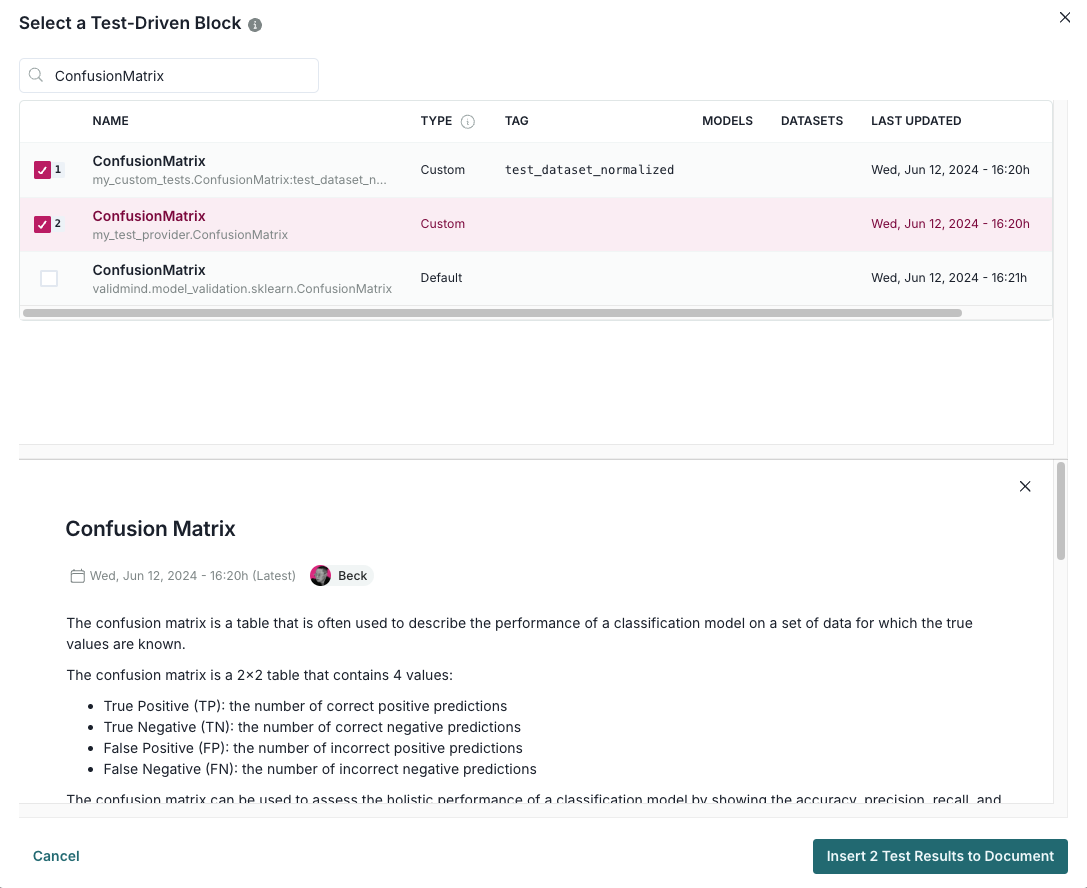
- Click on Custom under test-driven in the left sidebar.
- Select the two custom
ConfusionMatrixtests you logged previously:
![Screenshot showing the ConfusionMatrix tests selected]()
The ConfusionMatrix tests selected Finally, click Insert 2 Test Results to Document to add the test results to the documentation.
Confirm that the two individual results for the confusion matrix tests have been correctly inserted into section 3.2 Model Evaluation of the documentation.
Insert custom test-driven blocks
- Select the name of your model you registered for this course to open up the model details page.
- In the left sidebar that appears for your model, click Documentation under Documents.
- Locate the Data Preparation section and click on 3.2 Model Evaluation to expand that section.
- Hover under the Pearson Correlation Matrix content block until a horizontal line with a button appears, indicating that you can insert a new block.
- Click and then select Test-Driven Block under from library:
- Click on Custom under test-driven in the left sidebar.
- Select the two custom
ConfusionMatrixtests you logged previously.
- Finally, click Insert 2 Test Results to Document to add the test results to the documentation.
Section 2
4 — Finalize testing and documentation
This is the final notebook in our introductory series, which will walk you through wrapping custom test results into your documentation, as well as how to update the configuration for the entire model documentation template to suit your needs.
Scroll through this notebook to explore. When you are done, click to continue.
Retrieve your code snippet
As usual, let’s connect back up to your model in the ValidMind Platform:
- Select the name of your model you registered for this course to open up the model details page.
- On the left sidebar that appears for your model, click Getting Started.
- Locate the code snippet and click Copy snippet to clipboard.
Connect to your model
With your code snippet copied to your clipboard:
- Open 4 — Finalize testing and documentation: JupyterHub
- Run all the cells under the Setting up section.
When you’re done, return to this page and click to continue.
Include custom test results
Reconnect to ValidMind
After you insert test-driven blocks, changes should persist and become available every time you call the preview_template() function:
- Continue with 4 — Finalize testing and documentation: JupyterHub
- Run all the cells under the Reconnect to ValidMind section.
When you’re done, return to this page and click to continue.
Log custom test results
Now that your custom test IDs are part of your template, you can now run tests for an entire section and all additional custom tests will be loaded:
- Continue with 4 — Finalize testing and documentation: JupyterHub
- Run the cell under the Include custom test results section.
When you’re done, return to this page and click to continue.
Configure documentation templates
get_default_config()
The utility function vm.get_test_suite().get_default_config() will return the default configuration for the entire documentation template as a dictionary:
- This configuration will contain all the test IDs and their default parameters.
- You can then modify this configuration as needed and pass it to
run_documentation_tests()to run all tests in the documentation template if needed. - You still have the option to continue running tests for one section at a time;
get_default_config()simply provides a useful reference for providing default parameters to every test.
Retrieve default configuration
- Continue with 4 — Finalize testing and documentation: JupyterHub
- Run the first cell under the Documentation template configuration section.
When you’re done, return to this page and click to continue.
Update template configuration
The default configuration does not assign any inputs to a test, but you can assign inputs to individual tests as needed:
- Continue with 4 — Finalize testing and documentation: JupyterHub
- Run the all the cells under the following Documentation template configuration section: Update the config
When you’re done, return to this page and click to continue.
In summary
Implementing custom tests
In this third module, you learned how to:
Continue your model development journey with:
Finalizing Model Documentation

ValidMind Academy | Home