Integrations examples
Adapt these usage examples for your own workflows or connections to interact with external systems.
- Create a Jira ticket
- Create a ServiceNow incident
- Start workflows via webhook
- Add webhook step triggers
- Synchronize models with AWS SageMaker
- Synchronize models with AWS Bedrock
Prerequisites
Workflow examples
These examples use HTTP request or webhooks to integrate with external systems:
An HTTP request step sends data from ValidMind to another service. A workflow can notify a partner tool when a model reaches a certain state or request an update in an external system. This pattern is useful when ValidMind owns the event and needs to push it outward.
A webhook step does the opposite. Another system sends a POST request to start a ValidMind workflow or to continue a workflow that is paused while waiting for a webhook to continue. This lets external tools trigger actions inside ValidMind when an event occurs on their side.
Create a Jira ticket
To create a Jira ticket when model validation requires attention:
In the left sidebar, click Settings.
Under Workflows, select a workflow you can modify or click Add Model Workflow5 to start afresh.
From the Workflow Steps modal, drag and drop an HTTP Request step6 onto the canvas, then connect it to your workflow.
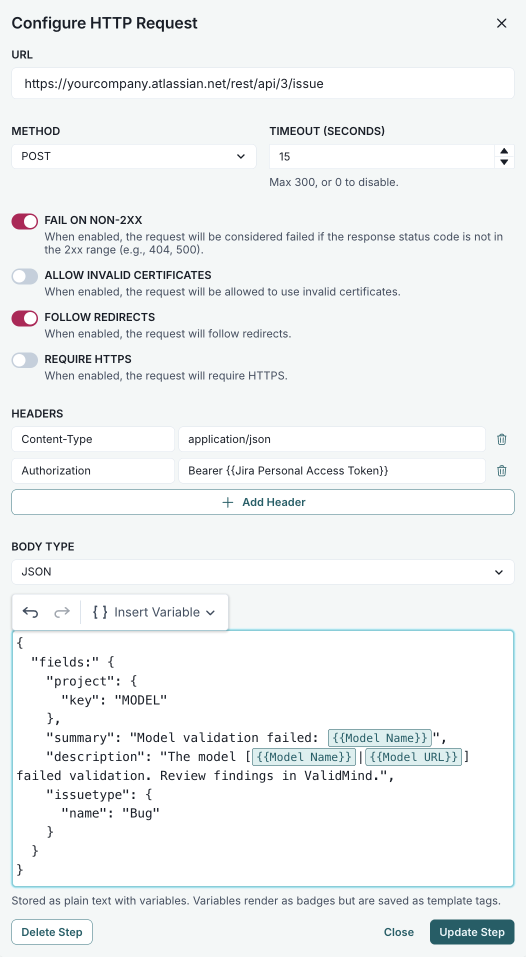
Double-click the step to open the Configure HTTP Request modal.
Configure the required fields, replacing the placeholder values with your own:
- url —
https://yourcompany.atlassian.net/rest/api/3/issue - method — POST
- headers — Add:
Content-Type:application/jsonAuthorization:Bearer {{Jira Personal Access Token}}
- body type — JSON
- body — Use the following JSON payload:
{ "fields": { "project": { "key": "MODEL" }, "summary": "Model validation failed: {{Model Name}}", "description": "The model [{{Model Name}}|{{Model URL}}] failed validation. Review artifacts in ValidMind.", "issuetype": { "name": "Bug" } } }- url —
Click Update Step to save your configuration.
The HTTP request to create the Jira ticket is sent when the workflow executes the step.
Create a ServiceNow incident
To create a ServiceNow incident when a data drift issue is detected during ongoing monitoring:
In the left sidebar, click Settings.
Under Workflows, select a workflow you can modify or click Add Model Workflow7 to start afresh.
From the Workflow Steps modal, drag and drop an HTTP Request step8 onto the canvas, then connect it to your workflow.
Double-click the step to open the Configure HTTP Request modal.
Configure the required fields, replacing the placeholder values with your own:
- url —
https://yourinstance.service-now.com/api/now/table/incident - method — POST
- headers — Add:
Content-Type:application/jsonAuthorization:Basic {{ServiceNow Credentials}}
- body type — JSON
- body — Use the following JSON payload:
{ "short_description": "Data drift issue detected: {{Model Name}}", "description": "A potential issue has been identified for model {{Model Name}} (link: [{{Model URL}}]({{Model URL}})). Please review the ongoing monitoring documentation in ValidMind.", "urgency": "2", "category": "Model Risk" }- url —
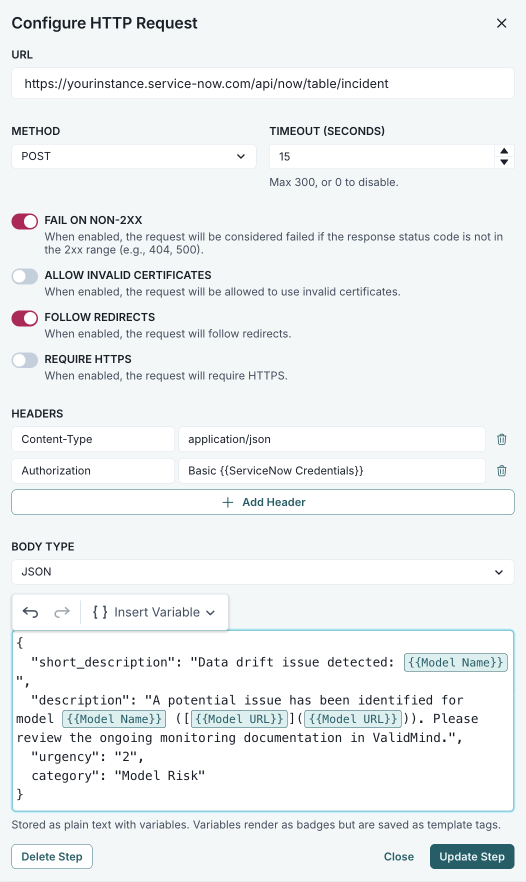
The HTTP request to create the ServiceNow incident is sent when the workflow executes the step.
Start workflows via webhook
To start a ValidMind workflow from an external system:
Add a new workflow, selecting the Via Webhook workflow start option.9
From the Workflow Steps modal, drag and drop a Webhook step10 onto the canvas, then connect it to your workflow.
Double-click the step to open the Webhook Step Trigger modal.
Copy or select the webhook details:
URL — Click Copy for the unique POST webhook URL to use when configuring your external system.
select target model for payload — Select the model that is associated with the webhook payload from the dropdown.
Payload — Click Copy for the JSON payload that external systems must send in their POST request, where the value for
target_cuidis shown after you select a target:{ "action": "run_workflow", "target": "<target_cuid>", "entity_name": "InventoryModel" }For the required authentication headers, click Copy for each of the following key-value pairs and paste them into your external system:
x-api-key:{API Key}x-api-secret:{API Secret}
wait for webhook trigger when reached — When enabled, the workflow pauses execution when it reaches this step and waits for the external system to send the POST request.
Click Save Workflow.
Send a POST request to the webhook URL with a JSON payload that includes the run_workflow action for the target model CUID:
curl -X POST https://api.prod.vm.validmind.ai/vm/api/v1/webhooks/xxxxxxxxxxxxxxxxxxxxxxxxx/xxxx -H 'Content-Type`: `application/json' -H 'x-api-key: xxxxxxxxxxxxxxxxxxxxxxxxxxxxxxxx' -H 'x-api-secret: xxxxxxxxxxxxxxxxxxxxxxxxxxxxxxxxxxxxxxxxxxxxxxxxxxxxxxxxxxxxxxxx' --data '{
  "action": "run_workflow",
  "target": "<target_cuid>",
  "entity_name": "InventoryModel"
}'
Add webhook step triggers
To trigger a waiting ValidMind workflow step to continue from an external system:
Open the workflow you want to configure, or add a new workflow.11
From the Workflow Steps modal, drag and drop a Webhook step12 onto the canvas, then connect the step to your workflow.
Double-click the step to open the Webhook Step Trigger modal.
Copy or select the webhook details:
URL — Click Copy for the unique POST webhook URL to use when configuring your external system.
select target model for payload — Select the model that is associated with the webhook payload from the dropdown.
Payload — Click Copy for the JSON payload that external systems must send in their POST request, where the value for
target_cuidis shown after you select a target:{ "action": "run_step", "target": "<target_cuid>", "entity_name": "InventoryModel" }For the required authentication headers, click Copy for each of the following key-value pairs and paste them into your external system:
x-api-key:{API Key}x-api-secret:{API Secret}
Click Update Step to save your configuration.
When the workflow reaches this step, it pauses and waits for the external system.
Send a POST request to the webhook URL with a JSON payload containing the run_step action for the model CUID:
curl -X POST https://api.prod.vm.validmind.ai/vm/api/v1/webhooks/xxxxxxxxxxxxxxxxxxxxxxxxx/xxxx  -H 'Content-Type`: `application/json' -H 'x-api-key: xxxxxxxxxxxxxxxxxxxxxxxxxxxxxxxx' -H 'x-api-secret: xxxxxxxxxxxxxxxxxxxxxxxxxxxxxxxxxxxxxxxxxxxxxxxxxxxxxxxxxxxxxxxx' --data '{
  "action": "run_step",
  "target": "<target_cuid>",
  "entity_name": "InventoryModel"
}'
Connection examples
Synchronize models with AWS SageMaker
To synchronize models registered in the ValidMind model inventory with AWS SageMaker models, you need to first configure the connection and then link the models:
Configure the connection

In the left sidebar, click Settings.
Under Integrations, select Connections.
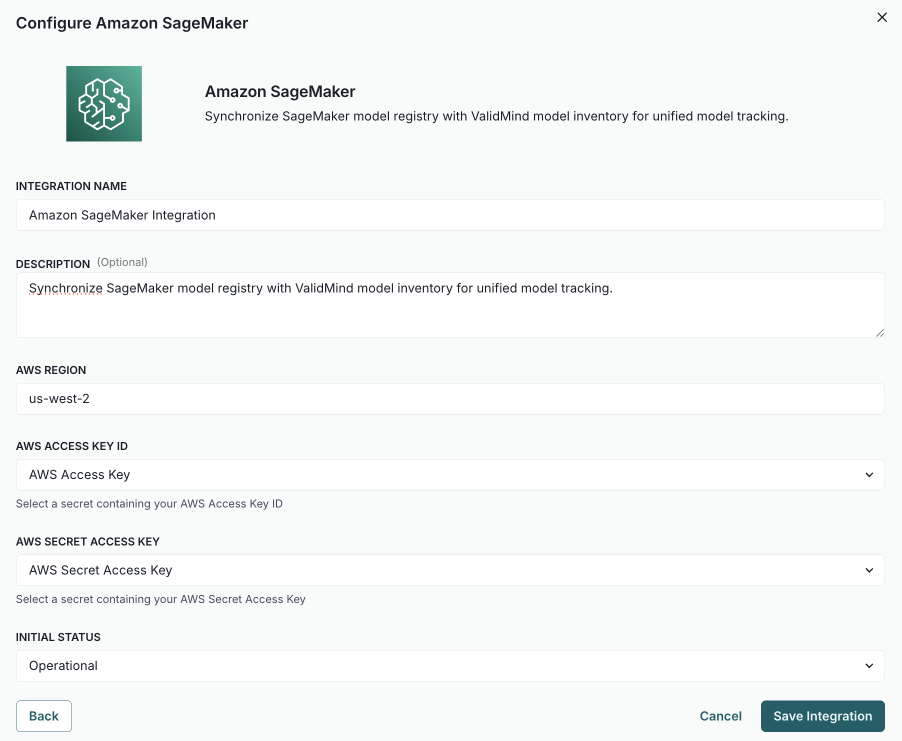
Click Add Connection.
In the modal that opens, select AWS Sagemaker.
Complete:
- integration name — How other admins can identify the connection.
- description (optional) — The intended usage or additional details.
- aws region - The primary region where your SageMaker model registry lives, for example
us-west-2. - aws access key id — The secret generated by AWS IAM with permissions to read the model registry.
- aws secret access key — The secret generated by AWS IAM with permissions to read the model registry.
- initial status — Set to
Operationalto enable immediately orDisabledif you plan to finish setup later.
Click Save Integration.
Test the connection:
- Hover over the AWS SageMaker connection you just created.
- When the menu appears, click on it and select Test Connection.
If the test is successful, the message Connection successful displays.
Link the models
In the left sidebar, click Inventory.
Select a model by clicking on it or find your model by applying a filter or searching for it.13
Scroll down until you locate the Amazon Sagemaker connection box in the right sidebar.
Hover over the Amazon SageMaker box.
When the menu appears, click on it and select Link Model.
In the modal that opens, click the select model dropdown to pick the AWS SageMaker model to link.
Optional: Click Test Connection to ensure the connection is working as expected.
If the test is successful, the message Connection Test Successful displays.
Click Link Model.
Synchronize models with AWS Bedrock
The AWS Bedrock integration lets you link ValidMind models to foundation models and generative AI agents in Amazon Bedrock, supporting governance across your AI/ML ecosystem.
AWS Bedrock exposes two primary integration surfaces:
Foundation model layer — Access to AWS-hosted and custom foundation models through the Bedrock model catalog (Discover and Tune views).
Application layer — Bedrock primitives such as agents, flows, and knowledge bases that represent built generative AI applications and workflows.
Configure the connection
In the left sidebar, click Settings.
Under Integrations, select Connections.
Click Add Connection.
In the modal that opens, select AWS Bedrock.
Complete:
- integration name — How other admins can identify the connection.
- description (optional) — The intended usage or additional details.
- aws region — The primary region where your Bedrock resources are deployed, for example
us-east-1. - aws access key id — The secret generated by AWS IAM with permissions to access Bedrock.
- aws secret access key — The secret generated by AWS IAM with permissions to access Bedrock.
- initial status — Set to
Operationalto enable immediately orDisabledif you plan to finish setup later.
Click Save Integration.
Test the connection:
- Hover over the AWS Bedrock connection you just created.
- When the menu appears, click on it and select Test Connection.
If the test is successful, the message Connection successful displays.
Link models from Bedrock
Once the connection is configured, you can link ValidMind models to your Bedrock resources:
In the left sidebar, click Inventory.
Select a model by clicking on it or find your model by applying a filter or searching for it.14
Scroll down until you locate the Amazon Bedrock connection box in the right sidebar.
Hover over the Amazon Bedrock box.
When the menu appears, click on it and select Link Model.
In the modal that opens, use the tabs to filter by resource type:
- All — View all available Bedrock resources.
- Foundation Models — AWS-hosted and custom foundation models from the Bedrock catalog.
- Agents — Generative AI agents you’ve built in Bedrock.
- Flows — Prompt flows and orchestration workflows.
- AgentCore Runtimes — Agent runtime environments.
Click select model to choose the specific Bedrock resource to link.
Optional: Click Test Connection to ensure the connection is working as expected.
If the test is successful, the message Connection Test Successful displays.
Click Link Model.